


The Latest From HMM

OEKO-TEX
Ben Uyeda shares why he likes sustainable towel brand OEKO-TEX.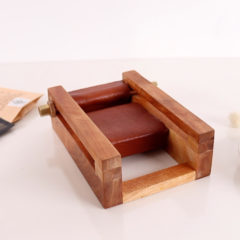
EP151 DIY Joint Roller
Ben makes a DIY joint roller.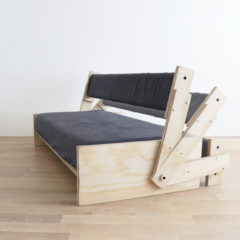
EP150 DIY Sofa Bed
Ben design and builds a DIY Convertible Sofa Bed with three basic power tools.
EP149 DIY Easy-To-Build Plywood Desk
Ben Uyeda builds an easy plywood desk.
EP148 DIY Easy-Build Desks
Ben Uyeda builds 3 different desks that each take under 2 hours.
Join RYOBI Nation
Tools + Materials

Learn about the tools and materials we like working with at HomeMade Modern.
See Tools + Materials
Sep
23
By Ben Uyeda


Open-plan apartments are rising in popularity and, while it's great to have the feeling of openness, it's nice to keep a semblance of privacy. In this design, the divider can be as simple or as ornate as you wish it to be. You can add or subtract panels if need be. The height and width can also be changed depending on your space. This project is beginners level for building and for sewing.
SUPPLIES:
Available at The Home Depot
For use as the frames.
Available at The Home Depot
I bought these in packs of 10 at The Home Depot.
Available at The Home Depot
For use as hinges.
Available at a fabric store or thrift store
For use as screen panels. I used old curtains. An inexpensive option is to get sheets from a thrift store.
TOOLS:

Available at Home Depot

Available at Home Depot

Available at Home Depot
INSTRUCTIONS:
I started with six equal size pieces of fabric at 20" x 72 5/8". Each finished piece should be 18" wide by roughly 63 5/8" long.
The type of fabric you use is completely up to you. I happened to have some curtains that I no longer needed and they were just the right size. I left an extra inch on each side so that I could have a seam allowance. The finished seam for the long side (72 5/8") was 1/2". To get this amount, I folded over one inch, ironed and folded that inch into 1/2" and ironed again. My fabric is canvas so it's not always necessary to use an iron. I used it in this instance because of how small the finished hem would be.


Make sure you have enough thread in your spool and bobbin to sew continuously from one end to the other. Repeat on the unfinished side.

On the small end (the now 18” side), fold over 1/2" for the seam.

Fold an additional 2" (for the conduit to slide through) and sew the length.

Before continuing with the sewing, I made one of the conduit frames so that I could stretch the fabric across it to get the exact measurement of where I needed to sew the seam.

Cut two lengths of conduit at 19 1/2" each. The corner pieces absorb about 3/4" on each side, which is how I came up with this seemingly random measurement. You'll be able to get three of these pieces from each 5’ length of conduit.

Take those two pieces and two pieces of the 60” conduit and attach them with the corner couplings using a Phillips Head screwdriver. Letting them lie flat on the table while attaching them will help to keep the frame square.

Attach the finished side of the fabric to the frame by threading the conduit through the loop and attaching it on both sides to the corners.

Flip the frame upside down and pull the fabric up and over the frame. Pull the fabric taut and mark it 2” from the fold over on each side. The 2” mark is more of a guideline. It can be longer or shorter as long as there is enough space to slide the conduit through.

Using a ruler, I drew a line attaching the two markings.

I measured 4 1/2" from the line (4” for the fold over and 1/2" for the seam) and cut off the excess.

Fold over 1/2" for the seam, 2” for the loop, and sew.
Repeat this process until you have all the panels you want. I chose to make six.
Set aside your fabric panels for the moment and break out the chop saw. To make the hinges, cut 10 pieces of 2” x 2” at 2 7/8". If a chop saw is not readily available to you, use a circular saw instead.

I used a belt sander to file down the edges and corners. You could also use an orbital sander but it is a bit awkward to do so with such small pieces. If you don’t have a belt sander or an orbital sander, you could just sand by hand.

I wanted the holes to be as straight as possible so I used a drill press to make two centered holes. You could use a cordless drill equipped with a boring bit if you don’t have access to a drill press. This option is less ideal because of how difficult it is to make a perfectly straight hole.

Gather all your pieces because it’s time to assemble. Make sure you have lots of room because the finished product will be over 10’ long.
Thread the lengthwise conduit through the hinges; two to a side.


An alternative to sewing loops on either end of the panels is to attach Velcro to one or more end. The aesthetic is nearly the same and the assembly and removal is much faster.

Once all the panels are attached, you’ll want to raise the higher hinge to be near to the top of the panel. I used zip ties to hold them in place. A more permanent option would be to drill a small hole where you want the bottom of the hinge to sit and attach a small screw.
For stability reasons, I wouldn’t recommend using less than four panels but do feel free to experiment with integrating it into your own unique space.


Good luck making your own room divider and please email, tweet or hashtag photos to @benuyeda, ben@homemade-modern.com or #homemademodern. For more detailed instructions, dimensioned drawings and different variations of the project, check out our soon-to-be-released book.

![These ideas keep things simple, serene, and totally doable. No clutter, just calm, sun-washed vibes you’ll actually use. Ready to turn a plain patio into a sanctuary? Let’s go. 1. Embrace Monochrome Concrete + Greenery Sketching a calm courtyard starts with a restrained color palette. A cool, grey concrete base pairs beautifully with pops of […] The post 15 Concrete Courtyard Ideas That Feel Minimal and Calm appeared first on Shinku Studio.](http://i.pinimg.com/236x/7e/bf/b4/7ebfb497bd0f6b65dbb628bf59a94598.jpg "These ideas keep things simple, serene, and totally doable. No clutter, just calm, sun-washed vibes you’ll actually use. Ready to turn a plain patio into a sanctuary? Let’s go. 1. Embrace Monochrome Concrete + Greenery Sketching a calm courtyard starts with a restrained color palette. A cool, grey concrete base pairs beautifully with pops of […] The post 15 Concrete Courtyard Ideas That Feel Minimal and Calm appeared first on Shinku Studio.")


![静寂の間 (Seijaku no Ma) – "The Space of Tranquility" [Concept Overview] 静寂の間 (Seijaku no Ma), or "The Space of Tranquility," embodies the essence of Zen architecture, where minimalism, nature, and spatial harmony converge. This concept reinterprets the traditional Japanese interior into a meditative sanctuary, emphasizing wabi-sabi aesthetics, biophilic principles, and the mindful use of space. The design creates a fluid transition between indoors and nature, using natural materials, diffus...](http://i.pinimg.com/236x/fd/d9/bf/fdd9bf370a7fc37f197303c26eff6142.jpg "静寂の間 (Seijaku no Ma) – \"The Space of Tranquility\" [Concept Overview] 静寂の間 (Seijaku no Ma), or \"The Space of Tranquility,\" embodies the essence of Zen architecture, where minimalism, nature, and spatial harmony converge. This concept reinterprets the traditional Japanese interior into a meditative sanctuary, emphasizing wabi-sabi aesthetics, biophilic principles, and the mindful use of space. The design creates a fluid transition between indoors and nature, using natural materials, diffus...")


